What is new here
Before you waste your time on the whole article, you might be asking yourself what is here different than in previous articles where I was doing similar blade or handle shapes. Well - the new (or different) parts here are:
- handle finish (very different to what I tried before)
- saya making (my very first)
I will make those that do not differ in particular to the previous ones a bit shorter
Introduction
It was back in March when my friend contacted me and asked whether I take custom orders. I said that I do, but on a "loose time basis' - based on my experience to keep promised delivery dates. The next question was whether middle August would be OK and I said .. "yes" :)We first talked about a simple carbon steel knife, but once it turned out that that a Damasteel would also be an option the project was upgraded.
The Design & Materials
The knife was ordered as a present and was first supposed to be a 135mm as the favourite knife of the recipient is a Zakuri Funayuki 135 (a great little knife indeed). But finally we agreed on a 150 mm long and 40 mm tall blade.
The knife was supposed to serve as the main, multi purpose blade and to have a western style, hidden dowel handle (that should fit a small hand). We went through several iterations of the design until we coined the profile of the blade.
The details of the handle were left up to me. I have made a few western style handle before and this was to follow similar lines.
Materials:
- Damasteel Vinland pattern
- Black buffalo horn
- Stabilised curly flame Boxelder from outbacktimbers
The Blade
This is by far the most expensive blade I have made - simply because of the material. But I do take my hat off to Damasteel - that material is 100% perfect - no imperfections of any kind, it is very easy to work with pre-HT and fairly easy after HT,


After that I would continue grinding the blade with a #60 grit belt and keep working towards a gently convex grind. I was aiming at a blade thickness (10 mm behind the edge) of about 1mm at the heel and some 0.8 mm close to the tip. I wanted to make the grind on a thin side as this was going to be a fairly lightweight knife, so too much of a 'workhorse' grind would not make much sense.
Since my friend who was ordering the knife does not have a whole lot of experience, my first 3 designs were on purpose very different. (1) a small gyuto, (2) a bunka-like knife and a (3) santoku like knife. The fourth design on the same page is simply my semi-custom 195 mm Bryan (a knife I like a LOT) for comparison.

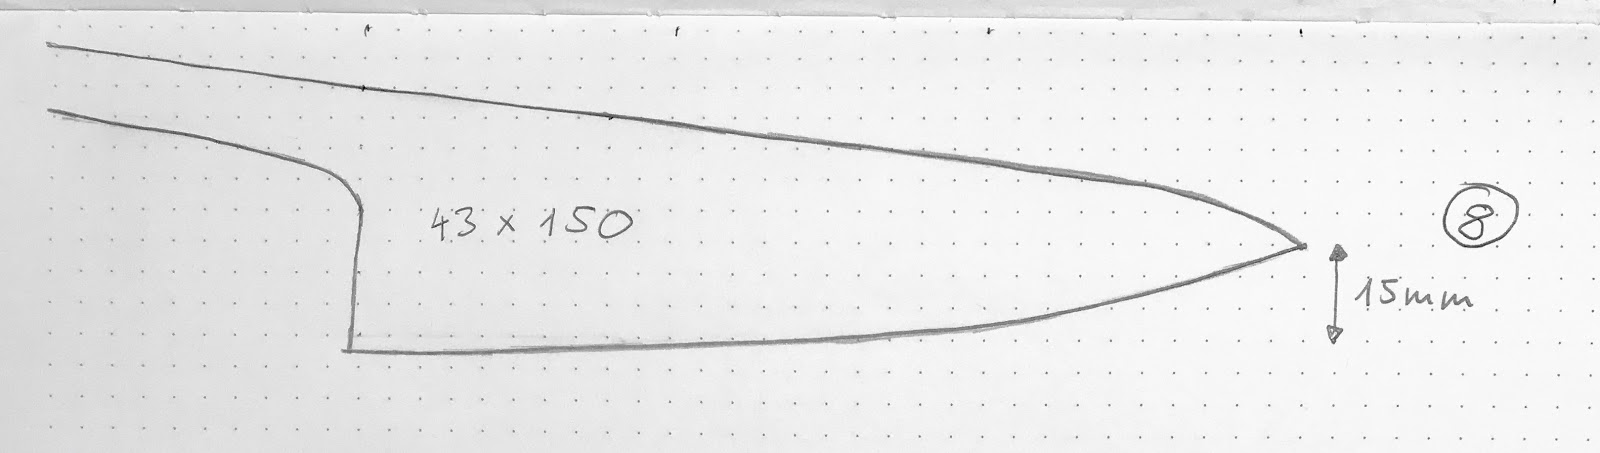
The selected design style was the (1), so I made a few variants (4 - 7) and a one more design motivated by the Raquin (8)

Since the steel is so expensive, in parallel I was trying to see whether I could fit one or two more small blades on the piece that I bought. Apparently the option is there, but it will require welding additional tangs on the blades. This will be a project for later :)

Making the blade
The process starts as usual - make a copy of a profile on a copying paper, trace in onto the steel, cut out with a hack saw.


Then I would clean up and fine tune the profile with a grinder. After that I would clean up all edges up to 220 grit, paint them with a permanent marker and scribe the center lines.

And start grinding with a #40 belt

I only ground the blade to some 0.9 - 1.0 mm on the edge prior to HT, I could have gone thinner, but I wanted to be on the safe side when it comes to deformation. The knife got hardened to the upper HRC range that Erasteel recommends (which yields about 64 HRC for the RWL34 and 60 HRC for the PMC27 components). At that hardness it would be, well hard, to correct any bents.
Before I would send the blade for HT I would file and sand the choil up to 400 grit to make my life easier after HT.
Once after HT (done by Jürgen Schanz) I would take the knife to stone and check the bevel behind the edge. Of course - there was still a lot of grinding to do, but I just wanted to see whether I have some low spots there that I need to be aware of.


 |
| Checking the bevels after HT on a 300 grit stone. |
 |
| Working on the distal taper. |

Once I wold be finished with the most of the grinding (about 0.1 mm away from the final thickness), only then I would grind the tip of the blade. I kept it tall all the way up to heat to protect the tip and make the blade easier to hold & grind close to the tip.
 |
| Tip grinding. The other side of the blade is protected with an orange Tesa tape. |
Once the bevels were ground up to #240 grit I would move rounding and polishing the spine and choil.

Once the spine and choil were polished I would again move to sharpening stones and finish the grind on stones. Again - since I have still a lot to learn when it comes to grinding on my new grinder (awesome machine from Claryx), I wanted to be on safe side that there will be no nasty surprises when the knife will be sharpened for the first time.
Once the knife was tested (it cuts!) I would proceed with hand sanding up to 2000 grit (400, 600, 1000, 2000). As always, I would tape the side that was facing down with orange Tesa tape (in the photos below also the piece of beech that I use as a support is covered with this tape. And yes - I would keep changing the sanding directions until the last grit.
Tip: When the geometry of the blade is done and you have already sharpened the knife once for testing, than you want to minimize the unwanted material removal from the edge. To achieve that use hard (steel) sanding bar at each grit and only once sanding with given grit is finished, then use a sanding bar with a softer backing just to smoothen the finish before moving to the next finer grit.
 |
| About to start sanding with #400 sandpaper |
 |
| ... and done :) The damascus pattern is showing already. |
To get the blade finish even nicer and smoother before etching, I got buffing wheels and compound for steel. It did help a bit, though not quite as much as I naively expected. Ater the buffing I cleaned the blade with a toluene and alcohol - but apparently did not do it well enough. I only learned that after I took the blade out of 37% HCl - there were fine longitudinal streaks that were not etches (well). This meant - back to sanding paper and try again later. Fortunately - I did not etch for too long so I managed to get the blade to pre-etch condition with just 1000 and 2000 grit paper.
I did not buff the blade before second etch and cleaned it with warm water and a detergent - and the etching went well this time. In both cases the blade was neutralized with solution of bicarbonate.
 |
| After second etch. Looking good :) |
Once the blade was etched the next step was to etch the logo. I have a private built etcher which is comparable to the Personaliser (good machine available online), but my etching head is just one large motor brush on which the copper wiring just broke off. So I had to come up with some temporary solution. Since I had a new head (at the time of writing of this article it is still not tested) on a way from a friend, I just drilled a hole in the brush and plugged the cable right in. Worked like a charm, even though I would not consider this a permanent solution.

Since it was a little while since I etched my logo on Damasteel I have decided to use an off-cut to test the etching first.
I am still using the stencils and chemistry I got from IMG Electromark. I am mentioning them explicitly as they have excellent customer support which was very helpful as I had little prior knowledge on the topic. They even gave me some feedback on several versions of my logo and how well it will etch. Anyhow. When I was making the order I got a set of smaller bottles of 4 etchants, but I have still used just the etchant No. 94. I guess I should make some tests with the other etchants and write a blog article about it :)
 |
| Test was positive :) |
After the first experience with etching the Damasteel for pattern I decided NOT to buff the blade before etching the logo - just to be on the safe side.
Important: Before you start etching make sure you did a best job possible to tape the logo to the blade. You want to avoid any parasitic routes for current as it will cause black frame lines around the stencil. Also - ideally you want to use etching head that is just large enough to comfortably cover the logo. Too large etching head will just mean more risk of unwanted etching outside the logo area.
 |
| The logo taped to the blade |
I do realize that I am repeating myself, but I found the advice of Caleb White in one of his YT videos really good. Once you start to etch - put the etching head in place, keep it still under pressure for about 3 seconds, then lift shortly and repeat. This will mean that the gas that is produced during the etching can escape and you will get a nice even result. I have to say that this works like a charm every time
I do about 15 - 20 second (integrated) etching with DC (for deep enough etch) and then about the same length with AC (if I want the logo to be black as with this knife). My etcher has 12V, but I am not sure about the current (will have to check)
The Handle
As already mentioned - the handle was going to be a western style, hidden dowel made from just a piece of stabilized wood and black buffalo horn.
 |
| The materials |
 |
| This is the basic idea. |


 |
| You can see small voids at the bottom part of the block |
 |
| Filing the slot for the tang (after drilling) |
Making the dowel became super easy with a band saw and a belt grinder. Once cut to length I would cut the slot with the belt saw and then use 120 grit belt (like in the image below) to widen the slot as necessary for the tang.

 |
| All components after dry fit & ready for gluing. |

Once the dowel is glued the next step is to glue the ferule on top. For this a use this simple clamp that seems to work better than the industrial one-side claps as t makes is easier to keep the pressure uniform.

And off to handle shaping. First - grind the ferule part so that the whole handle can lie flat on a flat surface. Than I would trance the design on the block and start coarse grinding with a #40 belt.


Once the rough profile of the handle was ground I would draw center line and some more helping lines on the upper and lower part of the handle for guidance and then I would continue grinding the handle to shape.
Tip: Be careful when shaping the handle with a coarse wide belt - you can very easily bite off more than you want. I actually found it easier to shape handles with a little 1x30" than with a large 2x50". When doing this work you do not need to hurry. I do not have a 1x30" anymore, but am actually considering to get it again as it was very practical for shaping western handles.

Here is a close up view of the porous part of the wood that later I will try to fill-in with a special CA wood glue for wood.

I would regularly insert the blade to check how does the handle feels in hand.
Tip: In general I have noticed that one has a tendency to make the handle larger than optimal. Should you start to feel that the handle size is 'there', than let it rest for a day or two and try again. You may find that it needs some more downsizing.

Once I achieved the size of the handle that I deemed OK I started with hand sanding. I have started with 180 grit paper. To remove 'bites' from edges of the hard #40 ceramic belt I would use a small piece of wood (of a size of a small matchbox) as well as a piece of dowel material.
Important: When hand sanding over an interface of 2 different materials (this is especially important of they are of different hardness) always use a hard backing (i.e. piece of wood) or otherwise you will sand-in a depression into the softer of the two. Been there, done that.
 |
| I do not have any dedicated vise for handle shaping. But a piece of knife steel in a normal vise does the job pretty well. |

Once the handle was sanded up to about 600 grit the time came to fill-in the aforementioned voids in the wood. Since I always wear gloves when working with oils or glue I would simply apply the glue with my finger.

This particular CA glue is relatively dense (it's a gel after all). In the meantime I got some more for the same purpose from Chestnut and they are great (they will be featured in one of the future articles this year).
I had to apply the glue 2 or 3 times until I filled the larger voids

Handle finishing
Before, I would - depending on the handle style and material - either apply just a few thin coats of Tru-Oil, or just some board butter. But then I had 'that talk' with Dave Martell and he opened a new world to me when it comes to surface finish.
First of all - there is no 'one size fits all' approach - different handle materials will require different process to get the desired finish (and the desired finish varies a LOT).
With the following process I was trying to achieve a more deep, glossy surface and not necessarily the most 'natural' feel in hand. So - how did I proceed?
Step one - sealing the handle
Since this wood was far from 'through stabilised' (or fully saturated with resin) as one could see from the photos above. This means that before finishing coats the wood needed the surface to be 'filled' with a resin mixture that would saturate it. I have used a 1:1:1 mixutre of a Epifanes varnish, TruOil and a Thinner. I would apply a healthy coat, allow the handle to dry (cure). Then I would wet-send it with 600 (and later 1000) sandpaper and a thinner (not water as that would soak deep inside the wood and probably take too long to dry). Then I would buff the handle (with wood buffing wheel and compound), clean it with a thinner ... and repeat. I did that 7 (!) times until all parts of the surface would show consistent behaviour when applying another coat.
Tip: In retrospect - I should have used first a few coats of thinned Birchwood Casey Sealer & Filler as that would have probably sped up the process.
 |
| Typical 'process photo' right after applying the 4th coat (I was trying to keep the track) |
 |
| And after wet sanding (sorry for the color tint) |
Step two - finishing the handle
The main difference to the first step was not changing the mixture - which I did (here I used only 1:1 varnish and thinner), but the way it was applied. I would use a small piece of a int-free cloth to apply the finish and the rest of the cloth to immediately polish the handle dry. In other words only a very thin layer of the finish would be applied.
Important: Before starting finishing make 100% sure that there are no remaining scratches on the handle, as they would not get removed during this step. If you find some imperfections, then wet sand and polish the handle again before moving to finishing.
I have applied 3 such a coats and got the handle to the point when I really liked how it looked. I planned to apply 2 more coats, but left that till after gluing onto the tang, as I was not sure whether toluene (that I use to remove excess epoxy during the handle mounting process) will affect the finish on the ferrule.
Mounting the handle
This was already a standard process. I would mix about 4 grams of G/Flex glue, wrap the handle in paper towel, gently clamp it in a vice (really gently, only as much as need to keep it still) slightly tilted towards where the cutting edge will be. Then I would heat up the mixed epoxy with hot air gun. This makes the epoxy much less viscous and thus much easier to pour inside the narrow tang opening. Once enough epoxy was inside the handle I would also heat up the tang of the knife and slowly insert it. One may need to gently move it up and down a bit so that the air can escape.
Once in place would wipe the excess epoxy (if no epoxy came out, than remove the blade and apply some more of it) with pieces of paper towels and toluene and only leave it to cure once I was sure that there was no epoxy where it was not supposed to be.
 |
| The g/flex epoxy is allow to cure till the next day |
Making the Saya
Let me say upfront - this is not going to be anything ground breaking, but after postponing it for a long time I have finally decided to give it a try - and was surprised that it was easier than I expected.
I have used two simple and very clean pieces of birch that I got from Robin Dalman when I bought from him a special chisel called 'saya nomi'. The chisel is very long and the handle 'bends away' from the chisel head so that one can work on a large flat surface without the handle of the chisel (and your own fingers) bumping into the surface of the wood.
The very first step is to make sure, that the two sides that will be facing each other are perfectly flat. I did that by hand with 80 and 180 grit sand paper.

In the next step I would draw the profile of the blade on on the the two boards. Then I would make a rather shallow cut along the line before I would start removing the wood with the chisel. As you can see I did not invest too much effort to come up with some more comfortable way to attach the board to the workbench, I will most certainly give it more though should I be doing sayas more often (something I would like to do).
 |
| Main tools: kiridashi and a saya nomi. |
I would regularly check the fit with the blade - I was aiming for a friction fit (as I was getting short on time to make also a pin).

Once the fit was as I liked it, I have first cut the saya parts to shape (profile) and then glued them together with the Titebond III glue.

 |
| I have used the tape to keep the alignment while clamping. |

Once the the shape was as I liked it I moved to hand sanding and cleaned up the saya to 400 grit.

This saya was not part of the order and was going to be a surprise for my friend, but also an experiment. I would have preferred some different color and here Robin Dalman came to the game again. I recalled that he stained some of his birch handles and asked him about that. It turned out that he has a very effective and simple way to do this.
Dying the Saya
Robin advised me to try a powder dye for wood that makes the working solution by mixing with water. I have bought several different colours (2 brown tones, green, yellow, black and some more) and tested them on an off cut piece of the same birch wood.
To dye a saya or a handle you need less than a coffee spoon of water and a very small amount of the dye. I applied it with my finger (while wearing single use gloves). I used black dye as the first coat.
In the next step (after drying the saya with a hot air gun) I have slightly sanded the saya (I have used a 1200 grit sanding pad) - the lightens the color a bit. Then I applied another layer - this time a yellow one. Again - after I would sand it after drying.
Note (from Robin): It is not the best idea in the world to dry wood surface with a hot air gun as you risk the wood cracking or warping.
I followed up with 3 coats of a mixture that I also used for the handle - thinner, varnish and a TruOil.
The result was a really cool looking saya. I will definitely be experimenting more with dying in the future.
 |
| Right after applying the dye - the saya is still wet. |
 |
| After drying with a heat gun. |
 |
| Sanded after drying (sanding pad is in the background) |
 |
| And after second dying step, sanding and finishing. |
Lessons learned
- I have learned how little I know about finished wood surface. The handle finishing went well, but there is definitely room for improvement. I will be experimenting more in the future and will keep you posted
- There is no free lunch when you try to etch a not 100% clean blade. The dirt (grease or other) will block the etching process and you will get uneven results.
- To make saya is easier that I expected. Important factors: (1) good quality chisel and (2) nice, clean easy to work with wood. Do not expect this to be quite as easy when you will pick some hard wood sort.
- Dying (staining) wood with water based stain is simple and fun to do, Give it a try.
Finished knife


 |
| Yeah, the say is the wrong side up here |


